Unlock Git Power: Mastering Commands
Introduction
Git, the popular version control system, has totally changed the game for how we all work on code together.
So, if you're starting with Git, here's the summary: You need to get your hands dirty with the basics, like what commands you need to know and how to use them. The more you use Git, the better you'll get at it.
For newbies, I suggest taking a look at https://learngitbranching.js.org/ - it's a super interactive way to learn Git!
Do you want to become super good at Git? You need to go beyond the basics and really delve into the details. It's all about practicing advanced moves and following the best tips and tricks.
Here's a quick list to get you started on your Git mastery journey:
Visualize the log tree
You have cloned or updated a repository, and to understand it better, you'd like to look at the commit history. Wouldn't it be nice to get a visual representation of all that has happened?
The git log command will display the commits log, so the best way to view the log tree is to customize it. Try this command:
git log --oneline --graph --allIt will display the commit history in a graph format. It's beneficial for understanding the branch structure and commit history.
Personally, I love using this command for personal projects. But when I work on team projects, I like to show extra information such as author and commit date.
git log --graph --all --pretty=format:'%h %C(auto)%d %s - %an, %cr'That's it! You have a smart way to browse your commit history.
Simplify your workflow
Who wants to spend forever typing out long Git commands? Life's too short for that, right?
That's where Git aliases come in handy. It allows you to create shortcuts for your favorite Git commands. It makes your workflow smoother and more efficient.
Instead of typing everything every time, you can set up a quick alias for this. This can be a real-time saver, especially for commands you use all the time. Plus, it makes it easier to remember long and complicated commands.
And here's the best part: Git lets you set up as many aliases as you want. But remember, having too many aliases can make them hard to remember. So, I recommend limiting yourself to just the commands you use most.
Here are some examples of creating aliases for common Git commands:
git config --global alias.st statusThis code sets up an alias named st for the git status command.
The --global flag indicates that this alias will be stored in your home directory's .gitconfig file. As a result, this alias will be accessible across all your repositories.
$ git st
On branch master
Your branch is up-to-date with 'origin/master'.

nothing to commit, working directory clean
Another way to configure a git alias is by editing the ~/.gitconfig file. Try to include this command:
[alias]
  st = status
Git aliases can also be used in git subcommands to, for example, execute two or more commands in sequence. For example, I use this alias a lot:
git config --global alias.ca !git add . && git commit -mThis alias will add all files that are unstaged with a git add . and then create a commit message, all with just a git ca.
Remember, the goal of using Git aliases is to make your workflow more efficient and enjoyable. So feel free to experiment with different aliases and find the ones that work best for you.
Group your commands
You can execute multiple Git commands in one line by separating them with a semicolon ;. This isn't specific to Git but it is a feature of bash-like shells. It allows you to execute several commands in one line. This way, you can save time and mix Git commands with other ones.
For example, if you want to add a library to your project and immediately commit changes, you can use the following command:
yarn add lodash; git commit -am "chore: add lodash dependency"Each command will be executed sequentially, regardless of whether the previous one succeeded or failed. So, it's a cool way to keep things tidy and save yourself some time.
Write clear and informative commit messages
In Git, a commit is a snapshot of your repository at a specific point in time. When you commit, you record the state of your files with a message describing what changes were made.
Writing good Git commit messages is super important. It helps everyone stay on the same page about what changes were made and why. This is very useful when you're working on a big project.
Plus, it makes it easier for everyone to work together because they can quickly see what changes each person has made. When you write clear commit messages, it saves time for everyone, whether they're looking over the changes or trying to fix something.
I believe that commit messages are like letters from developers to developers. So it's essential to try to focus more on why and what instead of how.
You'll invest a little time writing meaningful messages, but it'll be worth it when you or your colleagues look back at the code later.
You can use a structured approach like Conventional Commits. It provides a template for your commit messages, ensuring they contain a type and a message, with scope, body, and footer optional extras. It also has a simple way to indicate breaking changes.
Here's an example of a well-written commit message using the Conventional Commits format:
fix: prevent racing of requests

Introduce a request ID and a reference to the latest request. Dismiss incoming responses other than from the latest request.

Remove timeouts that were used to mitigate the racing issue but are obsolete now.

Co-authored-by: nickname <name@mail.com>
Related to issue #123
Additionally, you can configure a global commit message template. It will be used when you run git commit without the -m|--message flag.
If you want to learn more about commit messages, I suggest the Github blog article and the CBeans article.
By following this practice, you contribute to an easy-to-understand and navigate project history. This is super important for keeping the project moving forward smoothly.
Git Merge vs Git Rebase commands
When you work alone on a project, your choice of Git commands can be pretty basic. Your workflow usually involves adding files, making commits, and repeatedly pushing them. Branching becomes less critical, resulting in a more simplistic project tree.
Now, you've got teammates to collaborate with, and that's awesome. Collaboration can boost productivity, but it adds new challenges to version control. This is when you start to see conflicts. Immediately, two practices become absolutely essential: branching and pulling changes.
Git branching is a powerful tool that allows teammates to work in parallel on the same codebase. This is great for collaboration. Each team member can focus on developing a new feature or fixing a bug without disturbing anyone.
But, sometimes, a feature branch gets out of sync with the main branch. To resolve this, you have two main strategies: merging and rebasing.
Merging is all about combining the history of two branches into a new merge commit. This way, you keep the history of both branches intact. You can use the git merge command to do this.
Rebasing, on the other hand, moves the feature branch's history to the head of the main one. The cool thing about rebasing is that it gives you a cleaner, more linear commit history. You can use the git rebase command for this.
Here is an image to show how your git tree will look like in each strategy:
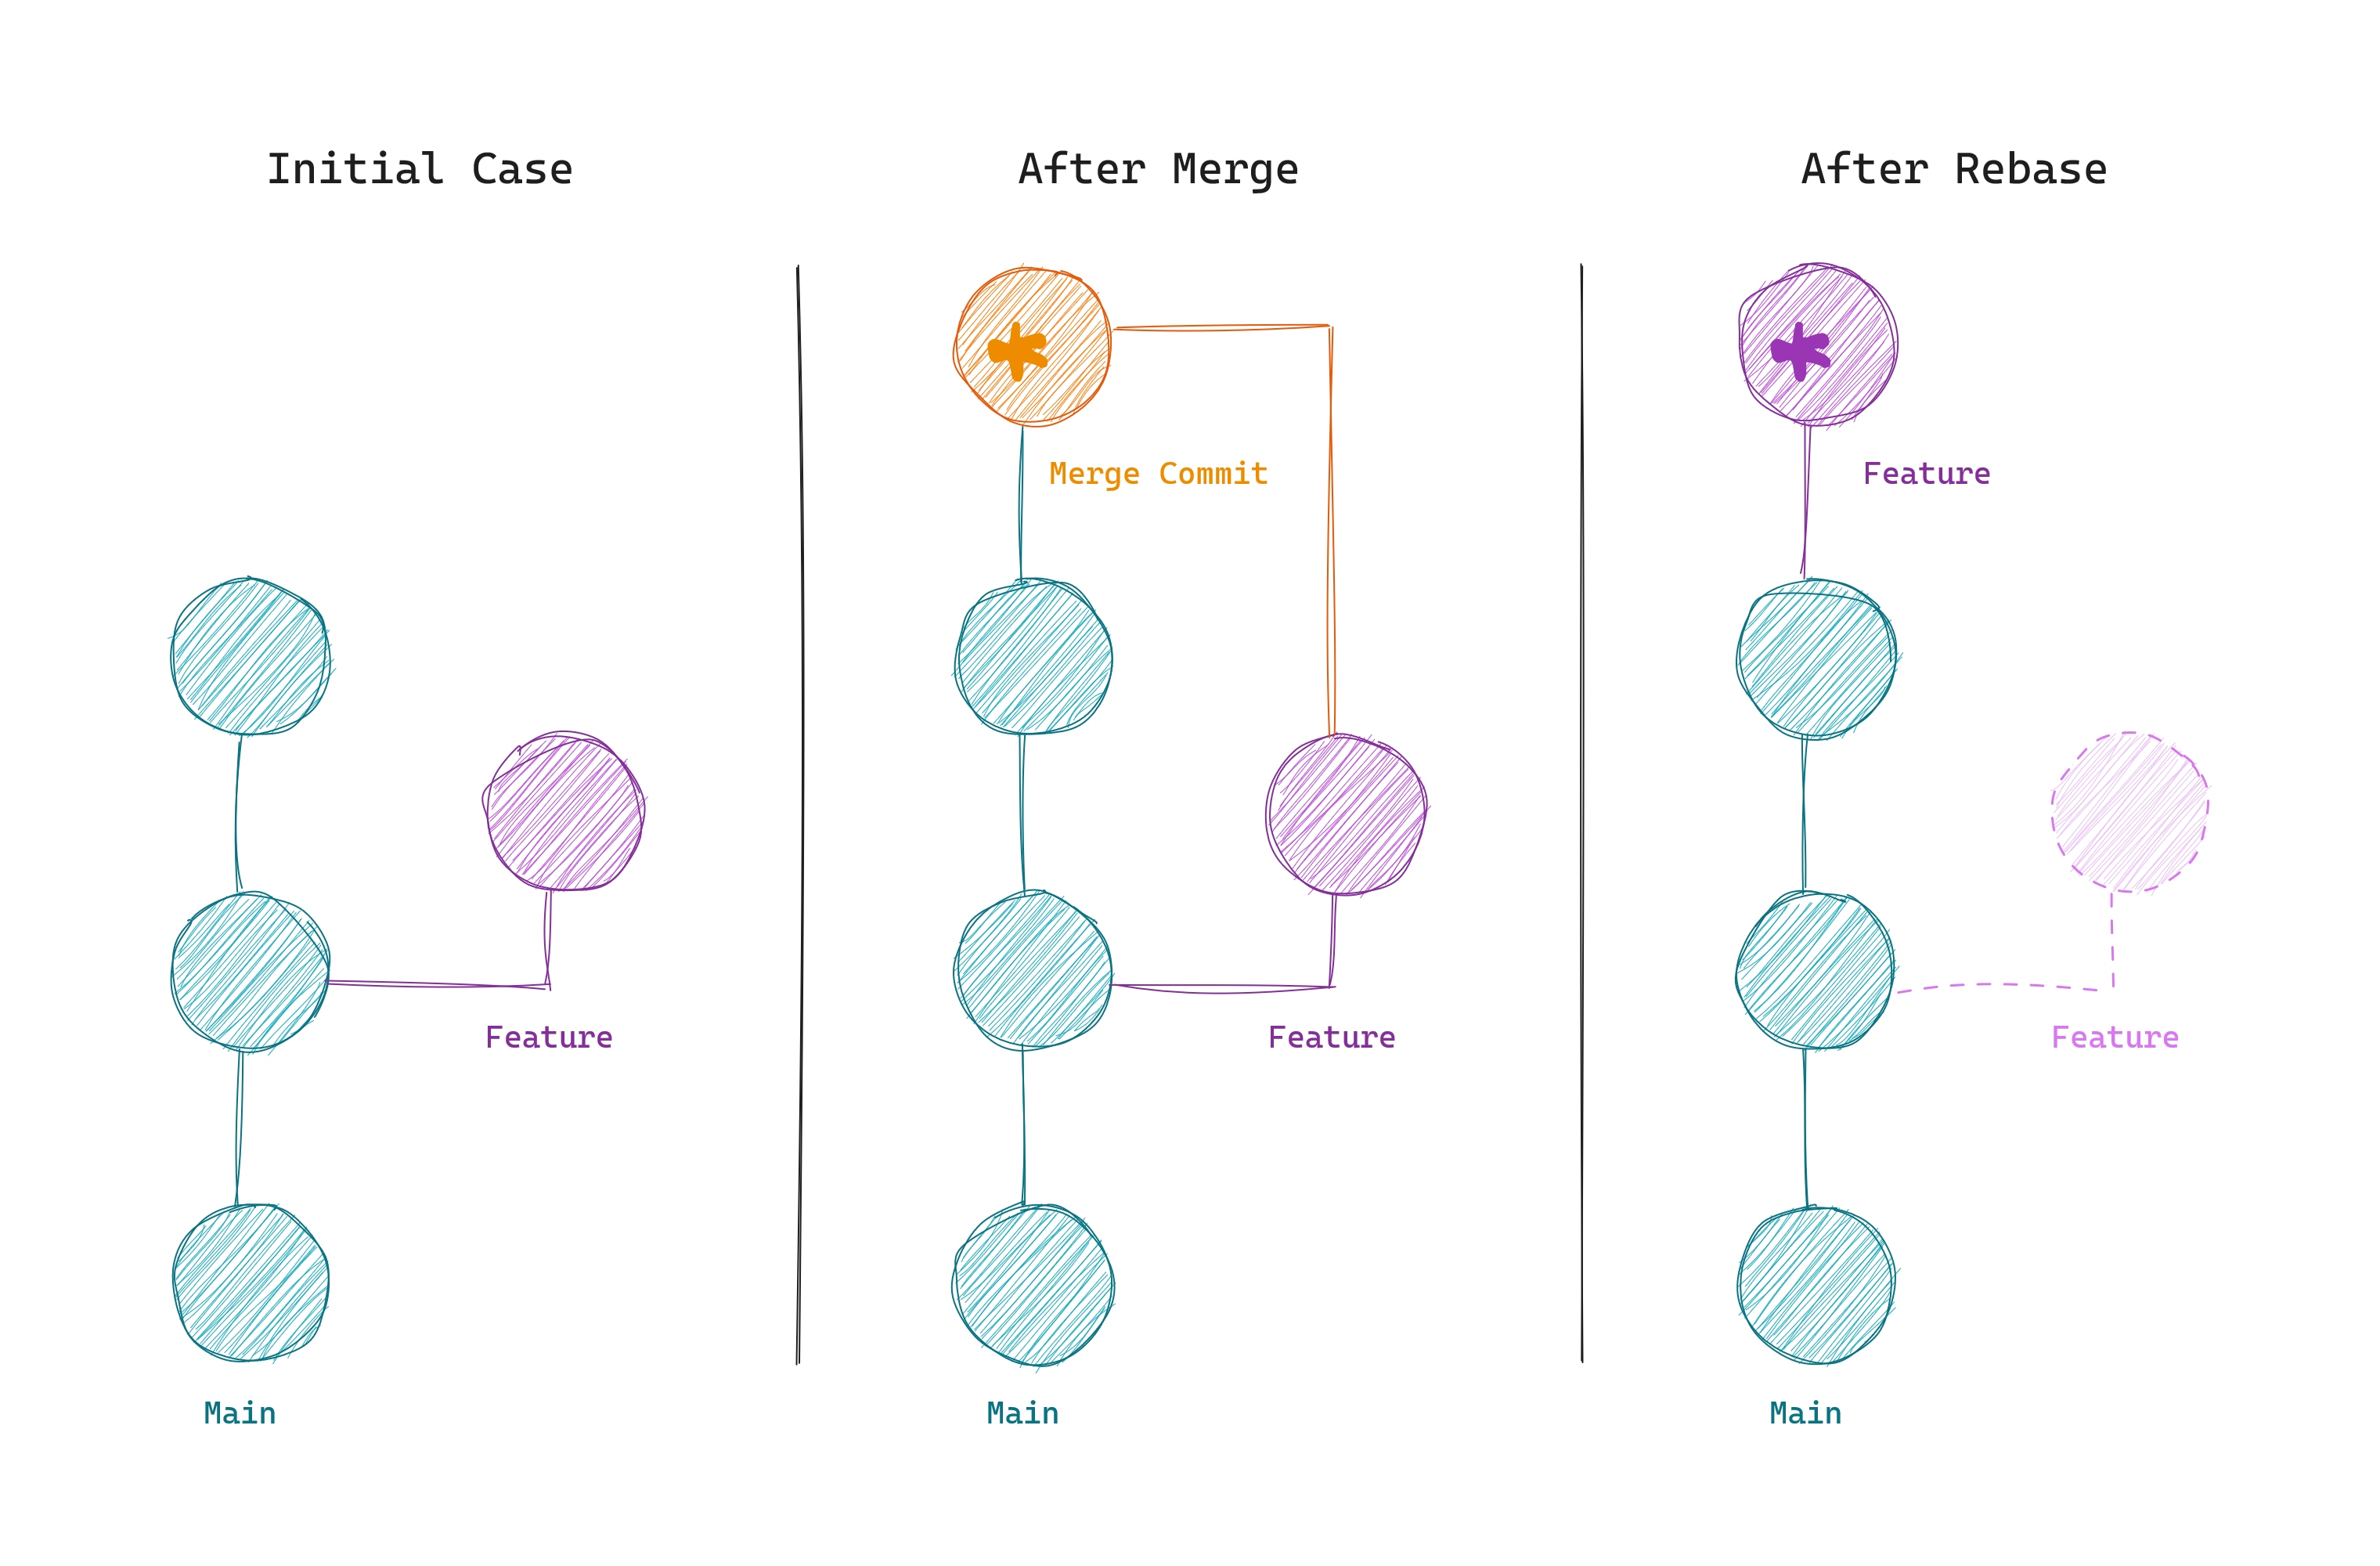
Rebasing allows you to rewrite the history. It's like a machine time! So you can organize your commits and create a more coherent history.
But, it must be used carefully. If you don't follow the "Golden rule of rebasing," you could end up in hot water. The Golden rule of Git rebase is simple: Never use it on public branches!
So, knowing when to use git merge and git rebase is the key to keeping your codebase in check.
Update your local repository frequently
So, you're busy coding away on a new feature. Meanwhile, the main branch might be getting some updates.
Don't freak out if this happens. It's good practice to apply these changes regularly to your local branch. This way, you don't avoid potential code conflicts, but manage them proactively.
In my view, it's a good idea to update your local repository at least once a day.
This way, you can resolve some conflicts as soon as possible. It will make it easier to merge your branch with the main one.
Conclusion
Keeping the development flow smooth and working as a team is essential.
If you follow the best practices, you'll be at the top of the game. Your workflow will be smart, your team will be closer, and your codebase will be easy to navigate.
Remember, mastering Git takes time and a lot of practice. So, make sure to use these commands frequently and understand their implications.
Thanks for reading, and enjoy your git adventures!