Test-Driven Development: A Guide to Improving Software Quality
Introduction
Test-Driven Development transforms developers' lives by boosting productivity, reducing mental fatigue, and enhancing focus. Also, it improves code quality, decreases the debug time, and optimizes the development process.
The top developers I've met rely on Test-Driven Development as much as possible. Why? Because it's the quickest and safest method to write code.
Test-Driven Development isn't a silver bullet for every problem although it can prevent many issues.
Let's dive in and see how!
What is Test-Driven Development?
Test-Driven Development, or TDD, is an important software development methodology. In this practice, you write tests first and then the code to make those tests pass. So, TDD ensures your code does what it's supposed to do.
Using TDD is like having a safety net for your code. It helps catch bugs early on, so you don't have to worry about them appearing in the final code.
Plus, it makes talking about what the software should do easier, keeping everyone on the same page.
TDD comes from Agile Manifesto principles and Extreme Programming. The main goal is to produce a resilient, optimized code that is easier to maintain and understand.
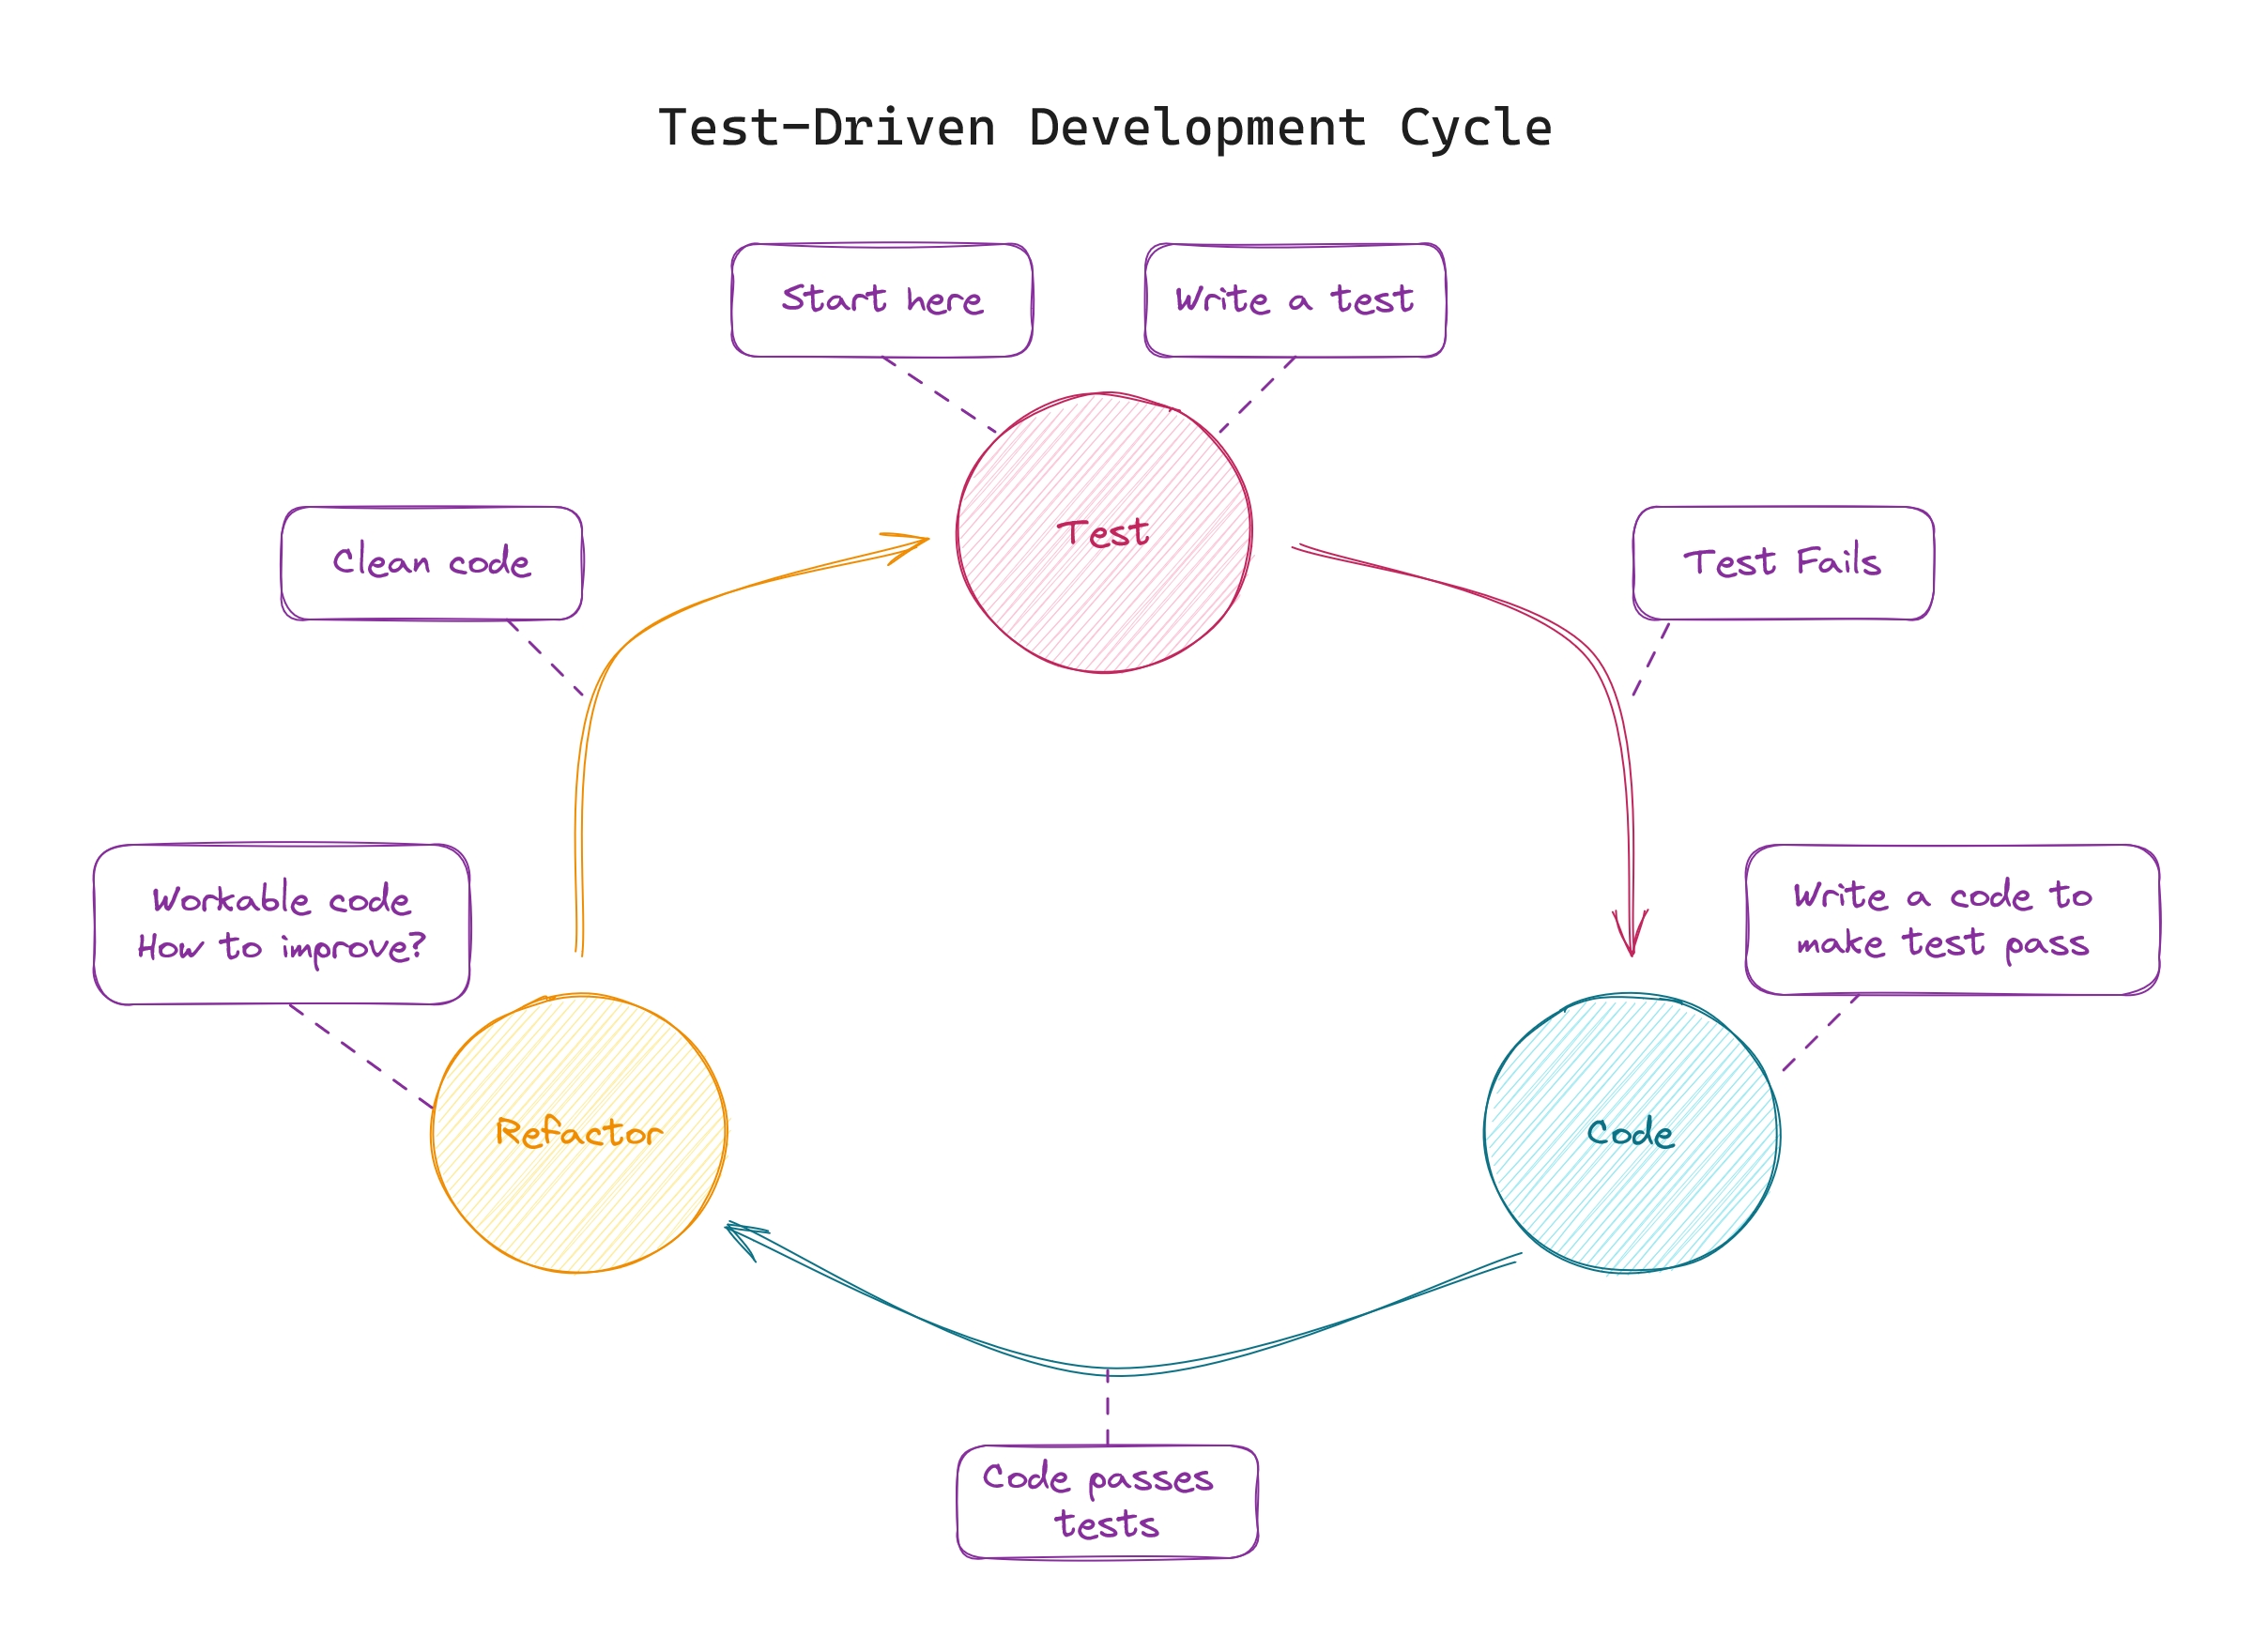
The TDD cycle: Testing, coding, and refactoring
So, you're curious about TDD? It's an easier but super effective way to create software. That's how it works:
-
Write a test that fails.
First, write a single micro-test for a specific software feature or functionality. The test is expected to fail because the feature still needs to be implemented.
-
Write a code to make the test pass.
Next, write just enough code to make your test pass. The key here is to write only the smallest code necessary to pass the test.
Ensure that other tests also pass to confirm nothing is broken.
-
Refactor your code to clean it.
Once the test passes, take a moment to refactor your code. Improve the design and structure of the code without changing its behavior.
Use clean code best practices to improve the quality of your code. For example, remove code duplication.
Repeat these steps for each new feature you want to add until your software is done.
In practice, TDD promotes the use of small, incremental development cycles. You receive frequent feedback and can make course corrections immediately.
Additionally, you are sure that the code does what the requirements demand.
The power of small steps: Micro-testing
A micro-test is a short, simple, automated test. It investigates a single behavior or a small feature of the software.
This technique aligns with the Baby Steps principle in TDD, where you make the smallest possible changes to the test and the production code.
Good micro-tests use the Arrange-Act-Assert pattern. See an example:
def test_full_name_consists_of_first_name_and_last_name():
# Arrange: Define the data values needed to get to interesting execution path.
first_name = "John"
last_name = "Doe"
user = User(first_name=first_name, last_name=last_name)
# Act: Invoke one or more methods on the object under test.
full_name = user.full_name()
# Assert: Inspect return values or members or whatever you want.
assert full_name == "John Doe"Here are some important rules about micro-tests:
-
The Code being tested never knows it is being tested.
A micro-test is only valid if the tested code behaves exactly as it does in production.
-
Read tests to explain the code. Don’t read code to explain the tests.
Micro-tests are the most useful and accurate documentation available for code.
-
Tests should not depend on data from other tests.
Micro-test must be independent. You need to be able to run it with any subset of test, in any order.
This creates freedom to move the code and prevents unexpected test failures.
The idea behind micro-tests is to guarantee that each functionality is tested and checked out before you move on to the next thing.
This keeps your codebase modular, maintainable, and easy to refactor.
Top strategies and best practices for starting TDD
Set up your workspace
Split your IDE into two views: one for production code and another for test cases. It's much simpler when you can see both files side by side.
Keep your terminal visible. It will show whether the tests pass or fail, helping you know which step of TDD you're on.
Set up your code editor whenever possible to run your test cases when you save files automatically. This will significantly speed up your workflow.
Choose an API test and configure it
An API test helps you create readable tests and makes maintenance and updates easier.
There are many API tests available. Among the most popular are Jest for JavaScript and Pytest for Python.
Use Baby Steps
Take your time, code step by step, and increase the rhythm as you feel comfortable. Avoid very complex codes.
Kent Beck, the practice creator, suggests you should take small steps when your confidence in the code is low. If you're confident in a piece of code, you can opt for slightly larger steps.
But be careful: big steps shouldn't be the rule but the exception.
Don't worry about testing everything
In micro-testing, our goal is to test all interesting paths.
So if your software doesn't have 100% code coverage, it doesn't mean that it isn't well-tested.
Real projects, developed with detailed micro-tests, achieve coverage close to 100%.
Focus on what matters
Choose the most relevant methods in the system instead of applying TDD to the entire project. For example, basic code is used everywhere, everything you don't fully trust, complex operations, or anything you might break while coding elsewhere.
There isn't a strict rule to determine what is worth it, it all depends on your context.
A practical example
To illustrate a Test-Driven Development cycle, let's do the following simple exercise.
Given an integer array
numbers, return the product of the numbers.Example:
Input:
[2, 2, 2, 1, 3]Output:
24Explanation:
2 * 2 = 4; 4 * 2 = 8; 8 * 1 = 8; 8 * 3 = 24
We'll walk through the TDD cycle, writing a failing test, moving on to writing enough code to satisfy that test, and finally, refactoring our code.
Let's go!
-
Step 1: Let's start creating our first failed test.
# The production code: def solution(input): return # Some tests: assert solution([]) == 0, "Should be 0" print("Everything passed.") -
Step 2: Now, we can write code to pass the test.
# The production code: def solution(numbers): if len(numbers) == 0: return 0 return # Some tests: assert solution([]) == 0, "Should be 0" print("Everything passed.") -
Step 3: It's time to refactor!
Here we can rewrite the function name with a more descriptive name.
Also, we can rewrite the conditional using the logical operator
not.# The production code: def multiply_all_elements(numbers): if not numbers: return 0 return # Some tests: assert multiply_all_elements([]) == 0, "Should be 0" print("Everything passed.") -
Step 4: Ok, we can advance and write another failed test with a new validation.
# The production code: def multiply_all_elements(numbers): if not numbers: return 0 return # Some tests: assert multiply_all_elements([]) == 0, "Should be 0" assert multiply_all_elements([5]) == 5, "Should be 5" print("Everything passed.") -
Step 5: We write the new code to pass the test.
# The production code: def multiply_all_elements(numbers): if not numbers: return 0 if len(numbers) == 1: return numbers[0] return # Some tests: assert multiply_all_elements([]) == 0, "Should be 0" assert multiply_all_elements([5]) == 5, "Should be 5" print("Everything passed.") -
Step 6: Now, we create a new failed test but use a slightly more complex arrangement.
# The production code: def multiply_all_elements(numbers): if not numbers: return 0 if len(numbers) == 1: return numbers[0] return # Some tests: assert multiply_all_elements([]) == 0, "Should be 0" assert multiply_all_elements([5]) == 5, "Should be 5" assert multiply_all_elements([2, 3]) == 6, "Should be 6" print("Everything passed.") -
Step 7: We can extend the code to meet the test's requirements comprehensively.
# The production code: def multiply_all_elements(numbers): if not numbers: return 0 if len(numbers) == 1: return numbers[0] product = 1 for _, number in enumerate(numbers): product *= number return product # Some tests: assert multiply_all_elements([]) == 0, "Should be 0" assert multiply_all_elements([5]) == 5, "Should be 5" assert multiply_all_elements([2, 3]) == 6, "Should be 6" print("Everything passed.") -
Step 8: We write the test of the exercise.
You can create as many tests as you want. There aren't limits to creating tests.
# The production code: def multiply_all_elements(numbers): if not numbers: return 0 if len(numbers) == 1: return numbers[0] product = 1 for _, number in enumerate(numbers): product *= number return product # Some tests: assert multiply_all_elements([]) == 0, "Should be 0" assert multiply_all_elements([5]) == 5, "Should be 5" assert multiply_all_elements([2, 3]) == 6, "Should be 6" assert multiply_all_elements([2, 2, 2, 1, 3]) == 24, "Should be 24" print("Everything passed.") -
Step 9: It's time to refactor again!
We can rewrite the loop using fewer commands and built-in functions.
Additionally, we can simplify the code by removing the checks for the condition of a single number, as these are already handled within the loop.
  # The production code:
  def multiply_all_elements(numbers):
    if not numbers:
      return 0

    product = 1
    for number in numbers:
      product *= number

    return product

  # Some tests:
  assert multiply_all_elements([]) == 0, "Should be 0"
  assert multiply_all_elements([5]) == 5, "Should be 5"
  assert multiply_all_elements([2, 3]) == 6, "Should be 6"
  assert multiply_all_elements([2, 2, 2, 1, 3]) == 24, "Should be 24"

  print("Everything passed.")
Conclusion
Test Driven-Development encourages you to write tests before the production code. This is great for identifying what needs to be done early. Additionally, you ensure the code does exactly what's needed.
I showed a complete guide about TDD. If you have any questions, please, get in touch with me on my social media.
Happy coding, and as always, thanks for reading.